Views: 0 Author: Site Editor Publish Time: 2026-07-09 Origin: Site


Have you ever paused a deck installation because your supports were just millimeters too short? Ordering the wrong pedestal heights leads to immediate mid-project delays. It also compromises structural integrity and wastes budget on unnecessary extension pieces. Getting this detail wrong halts progress immediately.
Selecting the right height is rarely about a single quick measurement. It requires carefully calculating minimum clearance, maximum elevation, slope gradients, and material thicknesses across your entire site. Without these accurate numbers, you risk building an uneven or unstable surface.
This guide provides the exact formulas, structural limits, and purchasing logic you need. You will discover exactly how to evaluate your subgrade and choose overlapping height ranges. By following these steps, you can confidently finalize a bill of materials for your adjustable plastic pedestal system tailored to your next build.
You cannot select the correct height bracket without understanding how the system actually works. Elevation capabilities depend entirely on the interplay of modular parts. Manufacturers design these systems to handle varying loads across different heights.
A typical standard unit consists of several distinct pieces. They work together to give you millimeter-precise control over your surface level.
Projects often demand varying clearance levels. You must understand the difference between ultra-low profiles and standard ranges. Ultra-low clearance requirements usually fall between 10mm and 40mm. These tight spaces rely on fixed bases or minimally adjustable pads. They lack a deep threaded core. You simply spin the head a few millimeters to level the surface.
Standard adjustable systems take over when heights exceed 40mm. They can scale upward past 1000mm. When you need extreme heights, you face a purchasing decision. Should you buy taller base units or stack extension rings on standard units?
Extension rings offer incredible flexibility. They allow you to hit 600mm or 800mm without stocking dozens of different base sizes. However, stacking too many collars increases the cost-to-benefit ratio. Sometimes, buying a purpose-built taller base unit provides better stability and saves money on individual plastic components.
Guesswork will ruin your installation. You need a reliable mathematical approach to order the right components. Fortunately, the core calculation remains simple and universally applicable.
You must determine the Total Finished Floor Elevation (FFE) first. This is the absolute top surface of your deck or patio. From this number, you subtract your structural layers.
The Core Calculation:
Required Pedestal Height = Desired Finished Deck Height - (Paver/Decking Thickness + Joist Profile Thickness).
If your desired deck height sits at 150mm off the concrete, you cannot buy a 150mm pedestal. If your decking is 25mm thick and your aluminum joist is 40mm thick, you subtract 65mm. You actually need a Height adjustable pedestal set to exactly 85mm.
Next, you must factor in the subgrade. Subgrades are rarely perfectly flat. You need to measure the highest and lowest points of your concrete pad, compacted gravel, or waterproofed roof deck. Use a laser level to map these elevations. The difference between the highest peak and the lowest valley dictates the full range of pedestals you need.
You must also account for drainage slopes. Flat roofs and concrete pads feature an intentional fall to guide water away from buildings. A standard 1% to 2% slope dramatically impacts your required heights over a long run. A 2% slope drops 20mm for every meter of distance. If your deck extends 5 meters, the pedestal at the far end must be 100mm taller than the pedestal at the start.
| Distance of Run (Meters) | Elevation Drop at 1% Slope (mm) | Elevation Drop at 2% Slope (mm) |
|---|---|---|
| 1 Meter | 10 mm | 20 mm |
| 2 Meters | 20 mm | 40 mm |
| 3 Meters | 30 mm | 60 mm |
| 4 Meters | 40 mm | 80 mm |
| 5 Meters | 50 mm | 100 mm |
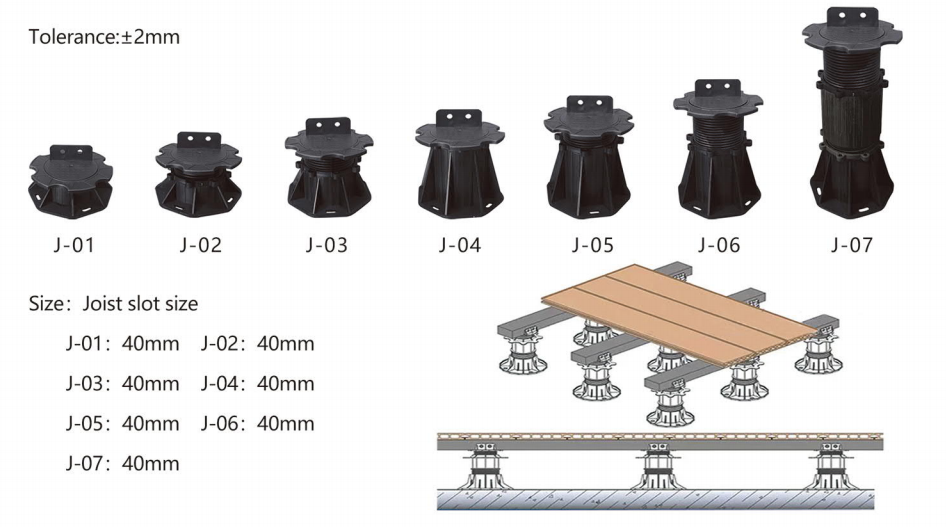
One of the most dangerous traps in project planning involves buying sequential pedestal sizes. Many buyers look at their measurements and order sizes like 50-80mm and 80-110mm. They assume this covers everything from 50mm up to 110mm seamlessly. It does not.
This creates a severe "dead zone" risk. Imagine your target height lands exactly at 79mm. You grab the 50-80mm unit. To reach 79mm, you must unscrew it almost to its absolute maximum limit. Then, you realize the ground slopes slightly. You snap on a base slope corrector. That corrector alters the geometry just enough that you can no longer achieve 79mm safely.
If you switch to the 80-110mm unit, it bottoms out at 80mm. It cannot compress down to 79mm. You are now stuck. You have a dead zone where neither pedestal works.
You solve this by purchasing overlapping ranges. This guarantees continuous adjustability across uneven terrain.
Once you nail down the ranges, you need to estimate quantities. The spacing of your support grid dictates how many units fall into each bracket. Joist spacing at 300mm centers requires significantly more pedestals per square meter than spacing at 400mm centers. Plotting this out on a site map helps you avoid over-ordering the wrong sizes.
Many skeptical buyers ask a valid question: Does a pedestal sitting at 50mm bear weight differently than one extended to 500mm? The short answer is yes. Height alters the structural dynamics of the entire assembly.
When you keep a unit compacted, the vertical load transfers directly into the base. The center of gravity remains incredibly low. As you add extension collars and raise the height, you introduce new mechanical stresses. A tall Plastic support pedestal acts like a column. If weight shifts unevenly, it can create a lever effect.
This brings us to strict thread engagement rules. Engineers mandate leaving a minimum amount of thread engaged inside the collar or base. If you unscrew a pedestal head too far, only a few plastic threads handle the massive live load above. A heavy footstep or a shifting paver can cause sheer failure, stripping the plastic threads and collapsing the surface. Never exceed the manufacturer's maximum height line marked on the core.
Lateral stability becomes a primary concern as heights increase. A project crosses from standard installation into high-elevation engineering when supports exceed 400mm (about 16 inches). Tall systems require mechanical ties, perimeter containment, or cross-bracing. Wind loads, walking vibrations, and slight material expansions will cause a tall, freestanding deck to sway.
To secure a tall installation, contractors often lock the pedestal heads to the joist framework using screws. They also ensure the deck surface fits tightly against structural walls to restrict horizontal shifting.
Even with perfect formulas and overlapping ranges, field conditions can throw off your final clearance. You must anticipate invisible factors that alter your final elevation.
Compression of waterproofing membranes represents a major sizing mistake. When you set heavy pavers or load-bearing decking onto a floating system, the weight presses down heavily. It will slightly compress rubber protection mats or rigid foam insulation beneath the base. This compression might only measure 1mm or 2mm, but if you sized your pedestal to its absolute minimum height, you will lose your required clearance.
Doorway threshold compliance is another critical area. You cannot simply build the deck flush with the interior floor. Local building codes heavily regulate step-down requirements from interior floors to exterior floating decks. These codes prevent rainwater from blowing under the door sill. If an inspector forces you to drop the deck height by 25mm to meet code, all your pedestals might suddenly be too tall.
Finally, never ignore the slope corrector profile. Concrete and roof decks slope for drainage. To keep your pedestal perfectly vertical, you add wedge-shaped slope correctors to the base or head. Adding a corrector introduces a fixed piece of plastic into the stack. It often adds 2mm to 5mm to the absolute minimum height. Failing to account for this extra thickness ruins tight installations.
Choosing the correct height range demands more than a single tape measure reading. You must evaluate the maximum and minimum subgrade variances meticulously. Apply the deduction formula to subtract your decking and joists from the finished floor elevation. Most importantly, always select overlapping ranges to eliminate installation dead zones.
Your next step should involve practical validation. We highly recommend ordering a diverse sample pack of your chosen sizes. Alternatively, run your site measurements through a manufacturer’s pedestal calculator. Validating the exact material thicknesses and slope percentages will secure your final bill of materials before you commit to bulk purchasing.
A: No. Cutting or modifying the base ruins the structural integrity and immediately voids the manufacturer’s warranty. It compromises the weight distribution, potentially damaging your waterproofing membrane. If your clearance is too tight, you must purchase specialized ultra-low profile pedestals or stackable rubber shims designed specifically for tight spaces.
A: Most manufacturers allow stacking multiple collars to reach heights up to 1000mm. However, standard limitations typically restrict building past 400mm without additional engineering. Once you stack enough collars to exceed 400mm, structural cross-bracing and perimeter containment become mandatory to prevent lateral sway and buckling under live loads.
A: True threaded, adjustable units usually start around 10mm to 15mm in height. Below this threshold, there is not enough physical room for a threaded mechanism. For clearances under 10mm, you must use non-adjustable, stackable rubber shims to achieve your desired leveling.
A: The height range remains the same, but you often need slightly different base designs. Perimeter and corner units require snap-off base features so they can sit flush against a vertical wall. Using standard wide bases near walls forces the pedestal away from the edge, leaving your decking unsupported at the borders.