Views: 0 Author: Site Editor Publish Time: 2026-07-20 Origin: Site


Discovering water pooling on your beautiful, newly installed deck is incredibly frustrating. You invested heavily in an outdoor living space. Now you find puddles forming after every rainstorm. This common scenario causes unnecessary stress for many homeowners.
Unlike traditional timber, modern polymer boards are largely non-porous. They do not absorb water. Moisture relies entirely on evaporation and gravity to clear the surface. Left unaddressed, chronic pooling leaves unsightly dirt rings. It can even encourage algae growth over time.
This guide helps you navigate the difference between harmless surface tension and structural flaws. You will learn actionable repair methods. We also cover proven prevention strategies for future builds. You will discover how to resolve everything from clogged gaps to permanent framing adjustments.
Evaporation Baseline: Minor surface water that evaporates within 24 to 48 hours is standard for non-porous WPC decking and does not indicate a structural failure.
The Pitch Rule: Proper deck frames must be built with a slight slope (standard industry practice is a ¼-inch drop per foot) to facilitate natural runoff.
Root Causes Vary: Chronic standing water is rarely a defect of the decking boards themselves; it is usually caused by inadequate framework, improper joist spacing, or clogged drainage gaps.
Permanent Fixes Require Framing Adjustments: While squeegees offer temporary relief, resolving severe pooling requires structural shimming, clearing gaps, or adjusting joist spans.
Homeowners often panic when they see water sitting on their new deck. However, surface water is not always a sign of failure. You must first understand the natural behavior of synthetic materials.
Industry benchmarks provide clear guidance on water evaporation. Mild weather pooling lasting under 48 hours is completely standard. Surface tension holds small amounts of water in place. Wind and sunlight eventually dry it out. Puddles lasting multiple days indicate a deeper issue. If you notice thick dirt rings or green algae, you likely have a structural drainage problem.
Traditional wood behaves like a sponge. It absorbs surface moisture rapidly. This absorption hides the water but ultimately leads to internal rot. Modern capped polymers repel moisture instead. The capping acts like a glass shield. Water has nowhere to go but off the edge. Composite Decking leaves water highly visible. This visibility proves the waterproofing technology actually works.
You can diagnose the severity of your issue through observation. We classify pooling into three distinct categories:
Micro-pooling: Small droplets get caught in the wood-grain embossing. This is entirely normal. They evaporate quickly.
Board-level pooling: Water sits in the middle of a single board. Slight bowing causes this. It requires monitoring but is not always an emergency.
Area pooling: Large puddles span multiple boards. The water resembles a small pond. This indicates a definitive structural or pitch issue.
Chronic water accumulation rarely stems from defective boards. The underlying substructure almost always causes the problem. We must examine the framing to find the true culprit.
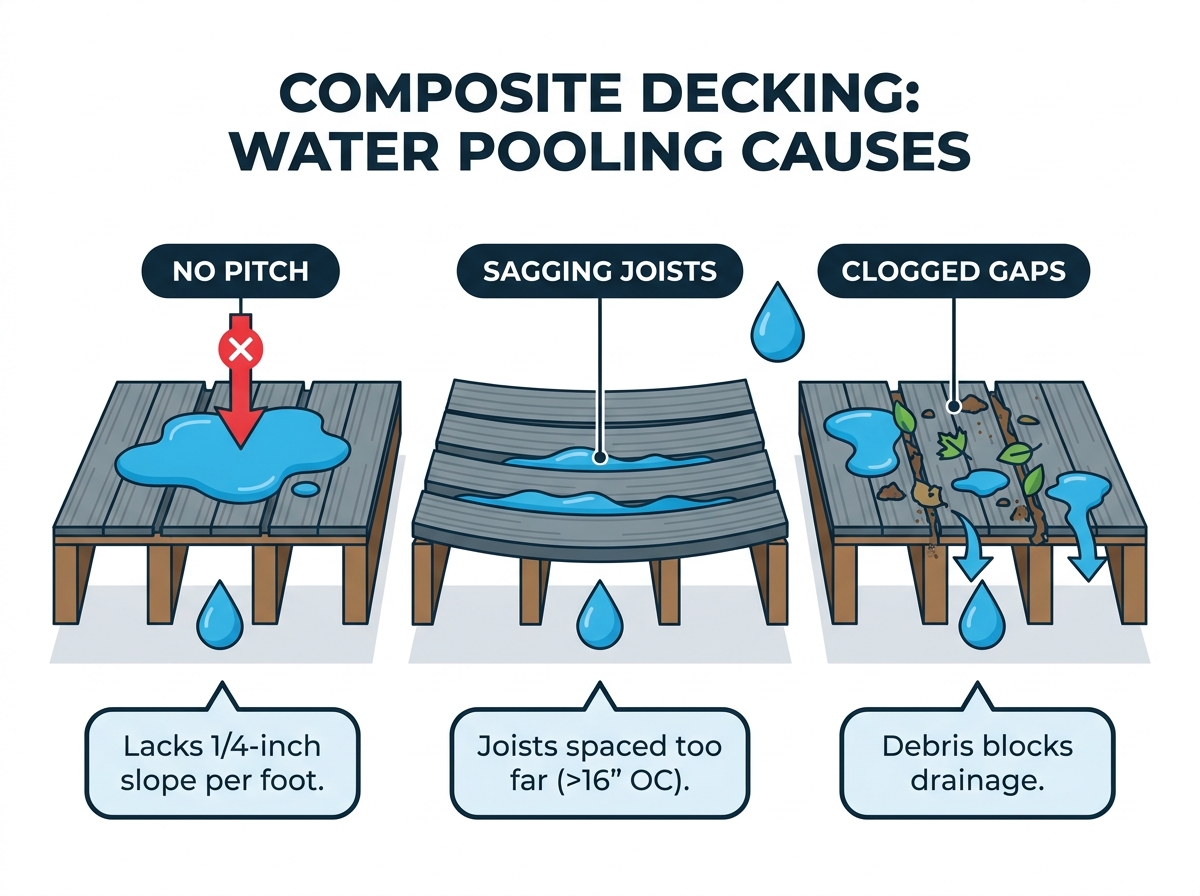
Building a perfectly level frame is the most common contractor error. Indoor floors must be perfectly level. Outdoor surfaces require a distinct slope. A flat deck fails to shed water. Gravity cannot pull the moisture away from the house. Without a built-in pitch, rain simply sits exactly where it falls.
Deck boards require consistent ¼-inch gaps between them. These channels allow rain to fall right through the surface. Organic debris accumulates rapidly in outdoor environments. Pine needles, crushed leaves, and mud fill these critical spaces. When debris blocks the gaps, downward drainage stops entirely. The deck surface acts like a solid roof, trapping water above.
Substructure framing directly dictates surface flatness. WPC decking is heavier than traditional cedar or pine. It is also more flexible. If joists are spaced wider than 16 inches on-center, the boards naturally deflect. Diagonal installations require even tighter 12-inch spacing. Wide spans cause the material to sag under its own weight. These low spots create permanent "birdbaths" on your deck.
Synthetic materials expand and contract with temperature changes. Extreme thermal expansion requires proper gap allowances at the board ends. If boards sit flush against walls or each other, expansion forces them upward. They buckle or cup in the middle. Cupped edges create a shallow trough. This trough traps rainfall and prevents it from reaching the drainage gaps.
You can address standing water through a phased approach. Start with simple maintenance. Move to structural repairs if the problem persists.
You should always attempt non-invasive solutions first. These methods cost very little and resolve most minor pooling complaints.
Clearing Gaps: Grab a plastic putty knife. You can also buy a specialized debris removal tool. Run the tool down the channels between every board. Push compacted dirt through the bottom. Do this twice a year.
Surface Sweeping: Heavy rains sometimes overwhelm the natural pitch. We recommend using a foam floor squeegee. Gently push excess water off the deck edge. The soft foam will not scratch the polymer cap. Never use metal shovels or stiff landscaping rakes. They cause permanent gouges.
If clearing gaps fails, you must adjust the framing beneath. You do not need to replace the entire deck. Targeted structural fixes eliminate deep puddles permanently.
Shimming Low Spots: Identify exactly where the puddle forms. Remove the hidden fasteners or screws holding those specific boards. Lift the loose boards carefully. Place exterior-grade plastic shims on top of the sagging joist. The shims elevate the board back to a flat plane. Reattach the fasteners securely.
Adding Blocking: Deflecting joists cause continuous bounce and sagging. You can stiffen the frame easily. Install perpendicular cross-blocking between the joists beneath the pooling area. Blocking locks the joists together. It prevents future rolling or sagging under heavy foot traffic.
Adjusting Fasteners: Sometimes installers overtighten hidden clip fasteners. This immense pressure forces the board edges downward, causing localized cupping. Loosen the screws slightly in the affected zone. The board will relax back into its natural flat shape.
Prevention beats remediation every time. If you plan to build a new outdoor space, strictly enforce modern construction standards. Proper planning ensures water manages itself automatically.
You must insist on proper sloping during the framing stage. Reiterate the ¼-inch per foot drop away from the primary structure. This standard is not merely a suggestion. It is critical for manufacturer warranty compliance. It also protects your home's foundation by directing runoff into the yard.
Never stretch your framing spans to save money on lumber. Mandate 16-inch on-center spacing maximum for residential installations. This prevents the heavy polymer boards from deflecting between the supports. If you plan to use heavy features like hot tubs, reduce spacing to 12 inches.
Detailed gap management prevents buckling and trapping. End-to-end gaps account for thermal expansion along the board's length. Side-to-side gaps allow for rapid water drainage. Always consult the manufacturer's temperature chart before securing the boards. A board installed at 40°F requires a larger expansion gap than one installed at 90°F.
Water falling through the gaps must go somewhere. Ensure the ground beneath the deck is properly graded. It should slope away from the house just like the deck surface. Alternatively, install a dedicated under-deck drainage system. Improper ground drainage creates rising dampness. It can lead to serious foundation issues over time.
Deck Installation Standards Summary
Structural Component | Standard Requirement | Impact on Water Drainage |
|---|---|---|
Deck Pitch / Slope | ¼-inch drop per foot | Forces gravity to pull water away from the house. |
Joist Spacing (Standard) | 16 inches on-center max | Prevents mid-board sagging and birdbath puddles. |
Joist Spacing (Diagonal) | 12 inches on-center max | Supports longer spans of flexible material evenly. |
Side-to-Side Gapping | ¼-inch between boards | Allows rain to fall through the surface instantly. |
Ground Grading | Slope away from foundation | Prevents rising moisture from trapped under-deck pools. |
If your current deck has failed entirely, you face a replacement decision. Selecting the right materials dramatically reduces maintenance headaches. Focus heavily on structural rigidity and moisture protection during the buying phase.
Early generation materials were uncapped. They exposed wood fibers to the elements. These fibers absorbed moisture, swelled, and warped. Warping creates permanent pooling traps. Advanced polymer capping surrounds the core on three or four sides. This shell prevents moisture absorption completely. The boards maintain their perfect factory shape for decades. They never swell to trap water.
Manufacturers offer two primary board shapes. Solid profiles resemble traditional lumber. They contain more material and offer higher structural rigidity. They resist sagging exceptionally well. Scalloped profiles feature grooved bottoms to reduce weight and cost. They are excellent products but require stricter joist spacing. You must frame perfectly for scalloped boards to maintain a flat, puddle-free surface.
Aesthetics directly influence drainage speed. Deep wood-grain textures look incredibly realistic. However, aggressive embossing creates tiny valleys. These deep valleys hold micro-puddles long after the rain stops. Smooth or shallow-grain boards shed water much faster. Consider a shallower grain if your deck sits in heavy shade where evaporation is naturally slow.
Material Profiles & Water Management Comparison
Material Feature | Drainage Advantage | Potential Drawback |
|---|---|---|
Full Polymer Cap | Zero absorption, maintains flat profile. | Leaves water visible until evaporated. |
Solid Board Profile | Maximum rigidity, highly sag-resistant. | Heavier to install, higher material cost. |
Scalloped Profile | Lighter weight, easier to handle. | Prone to sagging if joists exceed 16 inches. |
Deep Embossing | High slip resistance when wet. | Traps micro-puddles in the texture. |
Fixing standing water requires distinguishing between normal polymer surface tension and underlying framing errors.
Do not attempt quick fixes that compromise the material. Never drill drainage holes directly through the boards.
Keep the drainage gaps free of organic debris. Use a putty knife regularly to clear the channels.
Structural issues require structural solutions. Lift boards to add shims or cross-blocking for permanent flatness.
Take action today by inspecting your substructure. Clear out those clogged gaps before the next heavy rain. If you discover severe sagging joists, consult with a certified deck inspector. They can evaluate the overall health of your frame. If a total replacement is imminent, explore high-rigidity, capped options to guarantee a puddle-free future.
A: High-quality capped boards will not rot. However, chronic standing water causes secondary issues. It leaves stubborn hard water stains. It also promotes mold and algae growth on the surface. Ignoring severe pooling can eventually void some manufacturer warranties.
A: No. Drilling holes is a terrible idea. It exposes the uncapped inner core to constant moisture. This practice risks voiding your warranty immediately. It also weakens the board's structural integrity over time.
A: Wood is naturally porous. It absorbs surface water rapidly. This hidden moisture leads to eventual decay. Polymer boards are completely non-porous. They repel water perfectly. The water remains visible on top until it naturally evaporates or drains away.